Circularity
GD&T Symbol: 
Relative to Datum: No
MMC or LMC applicable: No
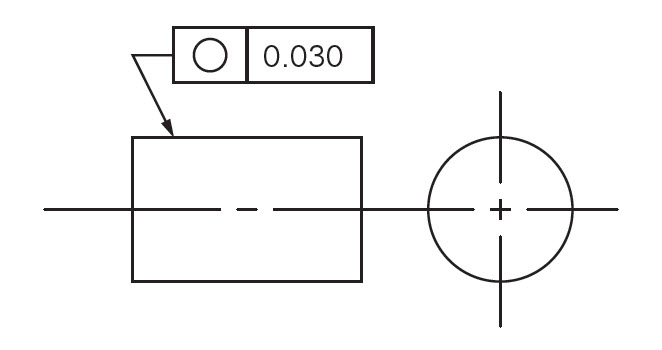
Drawing Callout:

Description:
The circularity symbol is used to describe how close an object should be to a true circle. Sometimes called roundness, circularity is a 2-Dimensional tolerance that controls the overall form of a circle ensuring it is not too oblong, square, or out of round. Roundness is independent of any datum feature and only is always less than the diameter dimensional tolerance of the part. Circularity essentially makes a cross-section of a cylindrical or round feature and determines if the circle formed in that cross-section is round.
GD&T Tolerance Zone:
Two concentric circles, one inner and one outer, in which all the points within the circular surface must fall into. The tolerance zone lies on a plane that is perpendicular to the central axis of the circular feature.

Gauging / Measurement:
Circularity is measured by constraining a part, rotating it around the central axis while a height gauge records the variation of the surface. The height gauge must have total variation less than the tolerance amount.
Relation to Other GD&T Symbols:
Circularity is the 2D version of cylindricity. While cylindricity ensures all the points on a cylinder fall into a tolerance, circularity only is concerned with individual measurements around the surface in one circle. If you think of a stack of coins, circularity would be a measurement around one coin while cylindricity would have to measure the entire stack. (cylindricity is actually a combination of circularity and straightness)
When Used:
Circularity is a very common measurement and is uses in all forms of manufacturing. Any time a part needs to be perfectly round such as a rotating shaft, or a bearing, circularity is usually called out. You will see this GD&T symbol very often on mechanical engineering drawings.
Example:
If you had a hole that was around a rotating shaft, Both pieces should be circular and have a tight tolerance. Without circularity, the diameter of the hole and shaft would have to be very tight and more expensive to make.
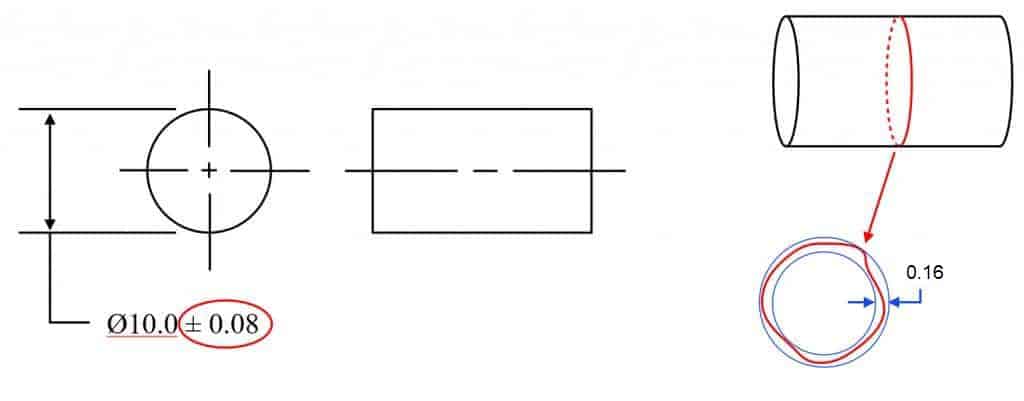
Example 1: Controlling circularity without GD&T Symbol
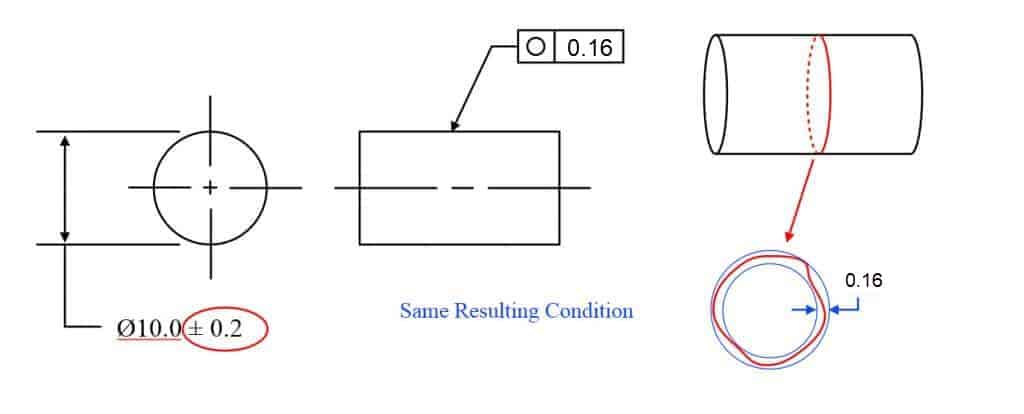
Example 2: Controlling both features with circularity allows the diameter tolerances of the part to be opened up much larger.
Why isn’t the circularity 0.08 to replace ±0.08 of size tolerance?
You may be thinking, “well hang on – if it is ± 0.08 and circularity is the radial distance between the two circles, wouldn’t that mean the circularity should be only 0.08 since it would be on both sides? No – and this is because of how the two-point measurement of any feature would work when compared to the smallest size vs the biggest size it could be. In Geometric Dimensioning and Tolerancing there is a rule that states you need perfect form at the MMC size – meaning at the largest size for a pin (smallest for a hole), your shape of this round feature cannot let it outside of a size of 10.08 for the first example.
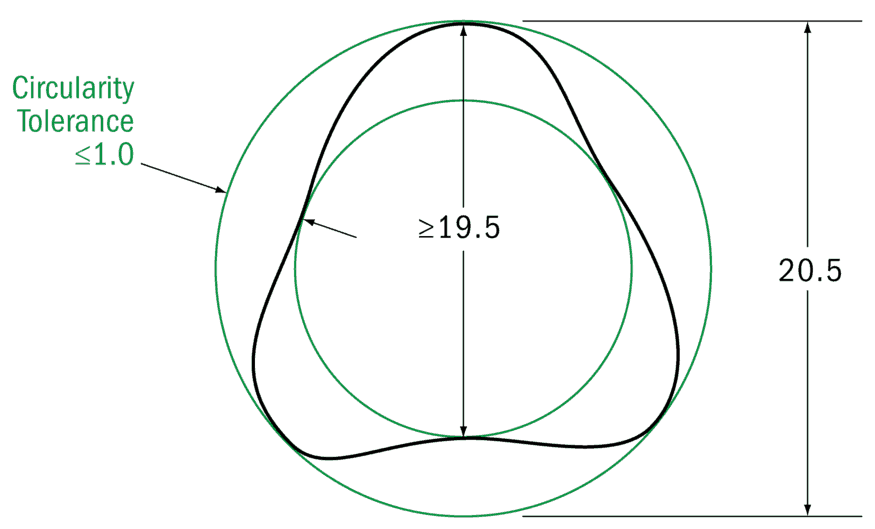
Here is a diagram showing where the surface is allowed to lie without any circularity added for a size tolerance of 20±0.5. As you can see the max size can cause the shape of the part to go to 20.5 – just like you would assume. However due to the rule in the GD&T standard – the LMC size – in this case, the smallest size tolerance, only needs to be inspected with a two-point measurement. For an odd-number lobed part – geometrically this means that the circularity is limited by the TOTAL size tolerance. So for a size tolerance of 1.0 (±0.5), your equivalent circularity control would be 1.0.
We go into depth on this in our GD&T Fundamentals Course when we talk about Rule #1 – the Envelope Principle and how it needs to be inspected.
To Recap – you need to be within a perfect boundary at MMC (largest pin, smallest hole) but for the LMC (smallest pin, largest hole size) you only need to take a 2-point measurement.
Final Notes:
Roundness:
Circularity in Geometric Dimensioning and Tolerancing is sometimes also referred to as Roundness. Since it is a 2-Dimensional tolerance sometimes multiple sections of the same feature must be measured to ensure that the entire length of a feature is within roundness. Usually, two or three measurements are taken to ensure the part meets roundness for each segment of the part.
Statistical Tolerance Stacks:
Because circularity specifies the form of the surface in a specific area it needs to be considered when calculating a statistical tolerance stack. For example, if you have a part with a specified diameter and circularity callout, you must use both in your statistical stack since the geometric tolerance can contribute to a large part envelope than just the diameter tolerance alone. This will skew the statistical tolerance slightly higher and should be considered since parts are rarely perfectly circular.


